Intro
On most bathroom jobs, a pop-down waste looks simple. Still, small mistakes lead to drips, sticking buttons, and slow drains. This guide gives you clear Pop Down Sink Drain Tips you can use today. We cover prep, sealing, heights, and quick fixes. You’ll see the right order, the right sealant, and the right torque. Follow the steps and you’ll leave a dry vanity and a smooth push action. We’ll also show smart handover habits that cut callbacks. Use these Pop Down Sink Drain Tips to work faster and with less hassle.
Quick Answer
For reliable pop-down basins, dry-fit first, use a 3–4 mm sealant bead, keep the trap at a 75 mm seal, and tighten locknuts finger-tight plus a quarter turn. Align the button, test for 2 minutes filled and 5 minutes drained, then leave silicone to cure for 24 hours. These Pop Down Sink Drain Tips prevent leaks and sticking.
Table of Contents
Key Takeaways
- Dry-fit every part and check overflow alignment before sealant.
- Use 3–4 mm silicone bead; allow 24 hours to cure before full use.
- Keep a 75 mm trap seal and a smooth 1:60 fall on waste pipes.
- Tighten nuts finger-tight + 1/4 turn; don’t crush seals.
- Water test for 2 minutes filled and 5 minutes drained, then recheck.
What Makes a Pop-Down Waste Different
A pop-down (push-button) waste has a spring-loaded plug you press to open or close. No lever, fewer parts showing. It suits most 32 mm (1 1/4") basin wastes in the UK. Many sets include an overflow collar; match it to the basin’s slot. The key is alignment. If the body twists, the button binds. If seals pinch, drips start.
Quick Specs That Matter
- Common waste size: 32 mm (1 1/4").
- Typical trap seal: 75 mm on basins.
- Silicone bead: 3–4 mm, continuous.
- Pipe fall: around 1:60 to 1:40.
- Cure time: 24 hours before heavy use.
These numbers keep you out of trouble on most jobs.
Preparation saves you time. Most contractors skip this step. Don’t make that mistake.
- Confirm sizes. Basin waste is usually 32 mm. Kitchen sinks are often 40 mm (1 1/2"). Don’t mix them.
- Inspect parts. Check the O-rings, fibre washers, and the spring button. No nicks or flat spots.
- Clean the ceramic. Remove old putty, silicone, and limescale. Use a plastic scraper.
- Dry-fit. Assemble without sealant. Check the overflow lines up. Check tailpiece reaches the trap (often 200–300 mm).
- Pick sealant. Neutral-cure sanitary silicone suits ceramic and stone. Avoid oil-based putty on natural stone.
- Lay out tools: adjustable spanner, basin wrench, silicone, alcohol wipes, cloths, bucket, and torch.
These Pop Down Sink Drain Tips reduce rework. A clean, dry rim and fresh seals make the job easy.
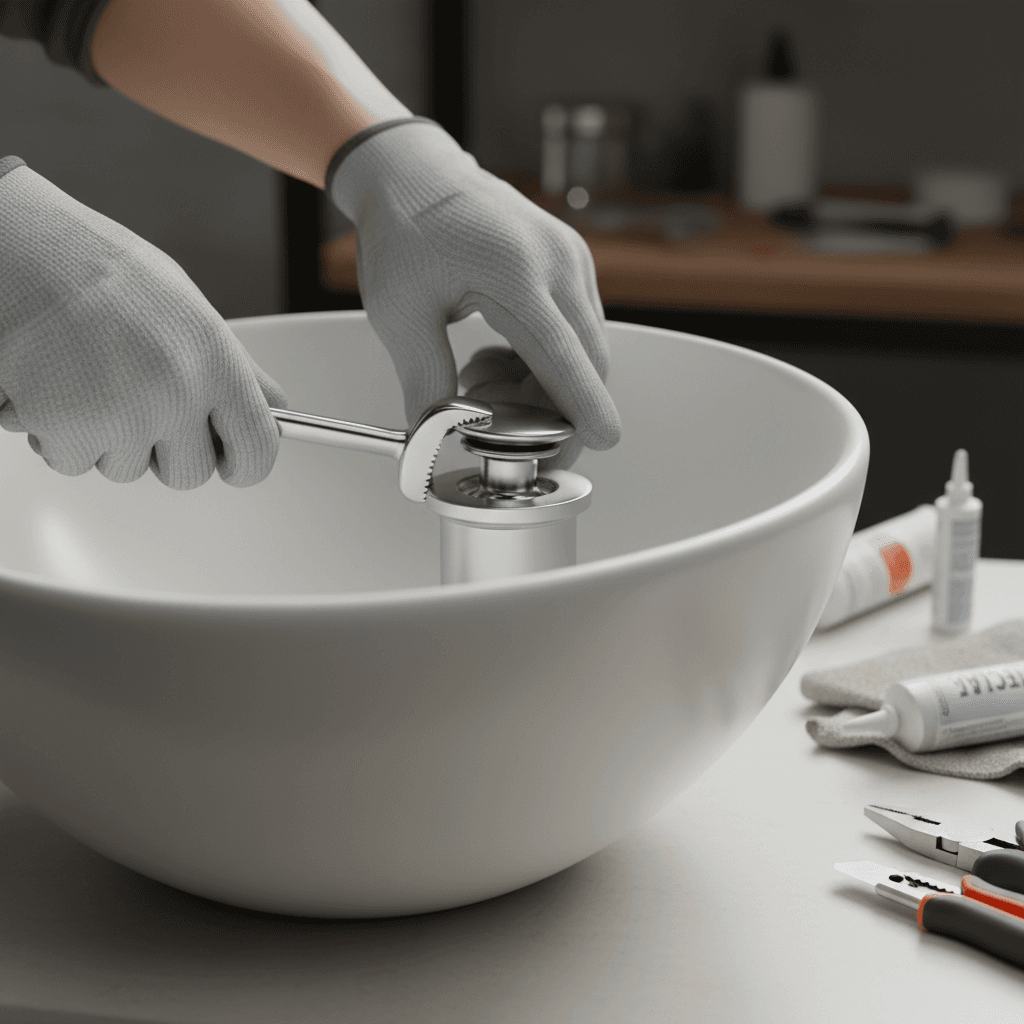
Pop Down Sink Drain Tips: Installation Steps
Follow this order. It keeps the body straight and the seals even.
- Wrap threads lightly (if manufacturer allows). One to two turns of PTFE on the tailpiece only. Don’t PTFE compression threads.
- Seat the top flange. Run a 3–4 mm continuous silicone bead under the flange. No gaps.
- Insert the body. Feed through the basin from above. Keep the logo square to the tap.
- Fit the bottom seal and washer. From below, add the rubber seal, then the metal or nylon washer.
- Tighten the locknut. Go finger-tight, then add a quarter turn with a spanner. Stop if the seal bulges.
- Connect the overflow. Clip or screw the overflow collar so the slot is clear. Don’t block it with sealant.
- Fit the trap. Keep a 75 mm water seal. Aim for a 1:60 fall on the horizontal run.
- Align the button. Press the pop-down button a few times. It must click up and down smoothly.
- Water test. Fill the basin to the overflow for 2 minutes. Dry all joints. Open the plug. Watch for 5 minutes.
- Final wipe. Remove squeeze-out silicone with an alcohol wipe. Leave 24 hours for full cure.
These Pop Down Sink Drain Tips will give you a neat finish and a smooth action.
Pop Down Sink Drain Tips: Sealing and Alignment
Sealing is not about force. It’s about contact.
- Use enough silicone. A 3–4 mm bead under the flange seals micro gaps in ceramic.
- No silicone on compression seals. Rubber needs clean, dry mating faces.
- Square the body. Hold the top flange straight while you nip the locknut. Twisted bodies make buttons bind.
- Don’t crush the basin. Overtightening can crack thin ceramic or deform seals. Stick to finger-tight plus 1/4 turn.
- Check heights. The tailpiece should insert 20–25 mm into the trap. Too deep and it bottoms out; too shallow and it leaks.
- Mind the overflow slot. Keep a 6–8 mm clear path so the basin can breathe. A blocked overflow slows drainage.
These alignment Pop Down Sink Drain Tips stop the two biggest issues: drips and sticking.
Fix Common Problems: Drips, Sticking, Slow Drain
When you’re on site, time is money. Here’s how to fix the usual faults fast.
Drip From Under the Basin
- Cause: Pinched seal or overtightened locknut.
- Fix: Loosen, re-seat the rubber, clean faces, retighten 1/4 turn. Add a fresh 3–4 mm silicone bead under the flange if the top face is uneven.
Drip at Trap Union
- Cause: Misalignment or cross-threading.
- Fix: Realign the tailpiece square to the trap. Hand-start threads. Tighten gently.
- Cause: Body twisted, grit in the mechanism, or spring misseated.
- Fix: Loosen the locknut, square the body, retighten. Rinse grit out. Refit the button per the maker’s notch.
Slow Drain or Gurgle
- Cause: Blocked overflow, no venting, or flat pipe run.
- Fix: Clear the overflow slot. Adjust to a 1:60–1:40 fall. Check for a proper 75 mm trap seal.
Smell From Waste
- Cause: Trap losing seal or biofilm.
- Fix: Ensure constant 75 mm seal height. Clean with warm water and mild detergent. Avoid harsh chemicals on seals.
These quick Pop Down Sink Drain Tips can save you 30–45 minutes on a callback.
Maintenance, Callbacks, and Handover Docs
Good handover stops most aftercare calls.
- Show the client how to press and release the button. Simple, but many don’t know the travel.
- Leave a care note: wipe seals monthly, no abrasive cleaners, and avoid bleach soaking.
- Book a check if it’s a hotel or rental. A 6–12 month service keeps units smooth.
- Photograph the install. Capture the trap height, joints, and sealant bead. Photos protect you later.
- Price small upgrades (like a brass finish or bottle trap change) in writing. Clear scope avoids disputes. If you’re also looking to streamline professional proposals, our guide on professional proposals will help you win and clarify scope.
- For small service calls, use invoice templates that save time and reduce admin. It’s common for contractors to convert accepted quotes straight to invoices to speed cash flow.
On maintenance programmes or multi-room fit-outs, capturing job details in the moment helps. Many contractors record a quick voice note and turn it into a clean proposal using tools like Donizo. The voice to proposal workflow and e-signatures keep small works moving.
FAQ
What sealant should I use on a pop-down waste?
Use a neutral-cure sanitary silicone under the top flange. Keep compression seals clean and dry. Avoid oil-based putty on stone basins. Let silicone cure for 24 hours before heavy use.
How tight should the locknut be?
Go finger-tight, then add a quarter turn with a spanner. Stop if the rubber seal starts to bulge. Overtightening can deform seals and cause leaks.
Why is my new pop-down draining slowly?
Check the overflow slot isn’t blocked with sealant, set a smooth 1:60 to 1:40 fall on the waste pipe, and keep a 75 mm trap seal. Also clear any debris caught in the mechanism.
Can I use PTFE on every thread?
No. Use 1–2 turns of PTFE only where the manufacturer allows, usually on the tailpiece. Do not use PTFE on compression fittings; they seal on the olive or rubber.
What size waste do most UK basins use?
Most bathroom basins use 32 mm (1 1/4") wastes with a 75 mm trap seal. Kitchen sinks typically use 40 mm (1 1/2"). Always confirm before you start.
Conclusion
Pop Down Sink Drain Tips boil down to clean prep, correct sealing, and gentle alignment. Dry-fit first, use a 3–4 mm silicone bead, keep a 75 mm trap seal, and test for 2 and 5 minutes. Then let silicone cure for 24 hours. Next steps: 1) Add these checks to your job sheet. 2) Save a photo of each joint. 3) Price small fixes clearly. For faster quotes and approvals on small plumbing jobs, platforms such as Donizo help you capture details, send proposals, and collect e-signatures quickly. Use these tips today and cut your callbacks on the next basin install.