Intro
Tired of stained, dusty concrete walls that kill curb appeal? The concrete sealer spray process can make those walls look brand new with even coverage and strong protection. In this guide, you’ll learn a field-tested process from prep to finish. We’ll cover tools, tip sizes, PSI, dry times, and simple checks you can trust on site. You’ll see how the Concrete Sealer Spray Process That Makes Walls Look Brand New works, why it lasts, and how to price it with confidence. Follow the steps. Avoid the common mistakes. Deliver clean results your clients will notice.
Quick Answer
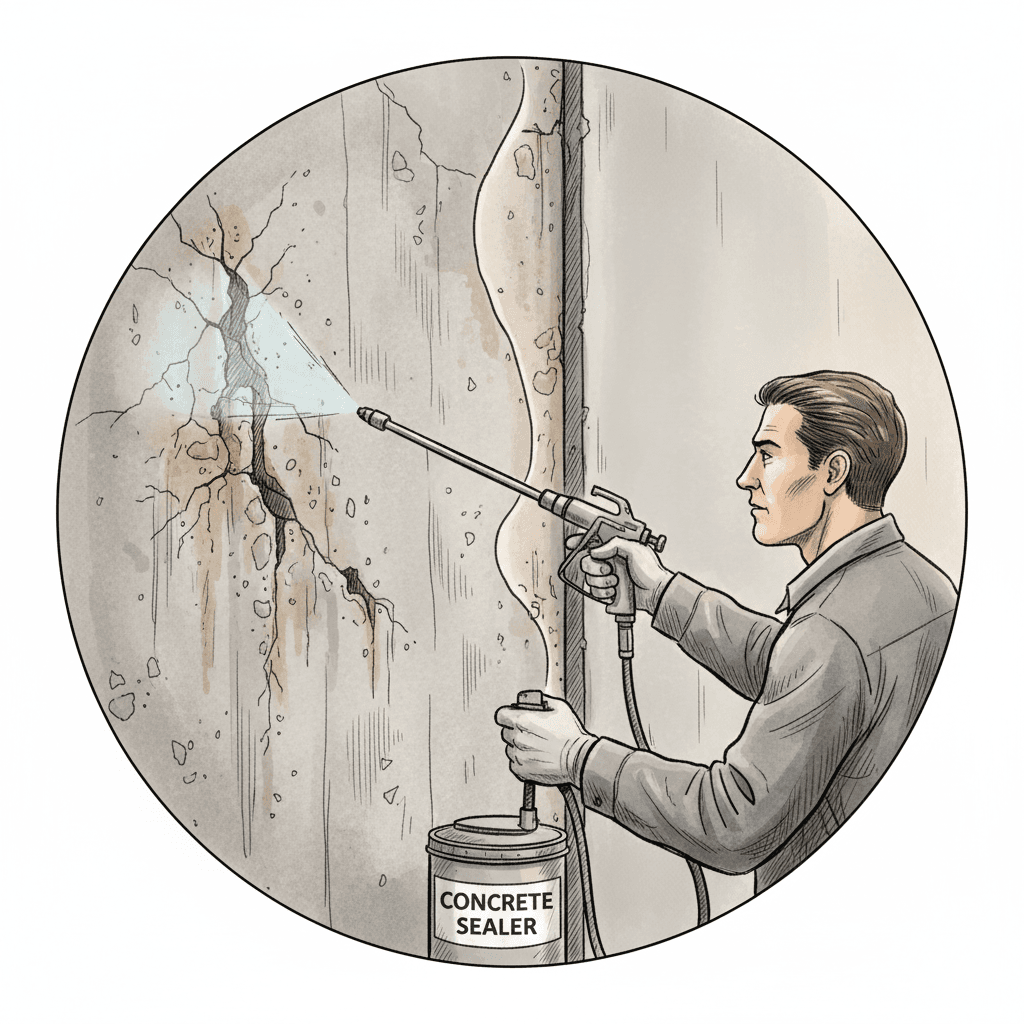
Spray a quality concrete sealer after proper cleaning, repairs, and moisture checks. Use an airless sprayer with a 0.015–0.021 inch tip at 1,500–2,500 PSI, 12–16 inches from the wall. Apply thin, even coats (2–4 mils wet), allow 2–4 hours between coats, and let cure 24–72 hours.
Table of Contents
Key Takeaways
- Clean, dry, and repaired walls are 80% of success.
- Use a 0.015–0.021 in tip at 1,500–2,500 PSI for even spray.
- Aim for 150–300 sq ft per gallon per coat, thin and uniform.
- Recoat in 2–4 hours; full cure in 24–72 hours.
- Temperature sweet spot: 50–90°F with low wind and low dust.
Why Spraying Makes Walls Look New
Spraying lays down a uniform film. No lap marks. No roller texture. That’s how the concrete sealer spray process gives walls a fresh, even look.
- It evens out minor color variations.
- It locks down dust and chalk.
- It repels water and stains, so the wall stays clean longer.
When you explain this to clients, they get it. A smooth, sealed wall reflects light better and looks newer. The Concrete Sealer Spray Process That Makes Walls Look Brand New is about prep, thin coats, and control.
Use simple, reliable gear. Don’t overcomplicate it.
- Airless sprayer rated for solvents and water-based sealers
- Tip: 0.015–0.021 inch (start at 0.017)
- Filter: 60–100 mesh (match product specs)
- PSI: 1,500–2,500 (lowest pressure that gives a clean fan)
- Extension wand: 12–24 inches for reach and control
- PPE: respirator (fit-tested), goggles, gloves
- Masking: 12–18 inch paper or plastic, painter’s tape
- Moisture meter or plastic-sheet test kit
Pick the right sealer:
- Water-based acrylic: low odor, fast dry, satin to matte
- Solvent-based acrylic: deeper color pop, higher odor
- Penetrating silane/siloxane: invisible, strong water repellency
- Polyurethane or polyaspartic: harder film, longer cure times, higher cost
Check the product TDS. Look for: tip size, PSI, coverage (often 150–300 sq ft/gal), and recoat window.
Surface Prep That Makes or Breaks It
Good prep makes the wall look new before you even spray.
- Degrease: Use a concrete-safe cleaner. Rinse well.
- Remove chalk and efflorescence: Light pressure wash (1,500–2,000 PSI) or scrub.
- Fix cracks: Route and fill with polyurethane or epoxy filler. Feather edges.
- Neutralize acids: If etched, rinse until pH is near neutral. Don’t skip this.
- Dry the wall: Target surface moisture under 5%. If no meter, tape a 12x12 inch plastic sheet for 24 hours. Any fogging or droplets mean wait longer.
- Mask everything: Windows, trim, floors, and landscaping. Take 20–30 minutes here. It saves hours later.
Tip: On most jobs, contractors rush drying. Don’t make that mistake. Trapped moisture leads to blushing and peeling.
Concrete Sealer Spray Process: Step-by-Step
This is the concrete sealer spray process that makes walls look brand new. Keep coats thin. Keep the fan steady.
- Stir and strain: Mix per label. Strain through a paint filter.
- Test spray: Dial pressure to the lowest setting with a full, even fan.
- Hold distance: Keep 12–16 inches from the wall.
- Overlap passes: 50% overlap for even build. Move 12–18 inches per second.
- Maintain angle: Keep the gun square to the surface. Don’t arc your wrist.
- First coat: Aim for 2–4 mils wet film. Light sheen, no runs.
- Backroll (if needed): For porous walls, a quick backroll levels and helps penetration.
- Flash time: Wait 2–4 hours or until tack-free. Cooler temps take longer.
- Second coat: Same speed and overlap. Don’t flood corners.
- Edges and details: Use a smaller tip (0.013–0.015) for tight spots.
- Drips and sags: Catch within 5–10 minutes. Feather with a dry brush or roll.
- Clean up: Flush sprayer with the right solvent or water. Label leftover material.
Coverage targets:
- Smooth tilt-up: 250–300 sq ft/gal
- Light broom or porous CMU: 150–225 sq ft/gal
- Dense sealer types (polyurethane): often lower coverage; follow TDS
Drying, Curing, and Maintenance
Dry and cure times make or break the finish.
- Touch dry: 30–90 minutes (water-based) or 1–2 hours (solvent-based)
- Recoat window: 2–4 hours typical
- Light use: after 12–24 hours
- Full cure: 24–72 hours depending on product and weather
Best conditions:
- Temperature: 50–90°F
- Humidity: below 70% if possible
- Wind: under 10 mph to avoid overspray and dry spray
Client care tips:
- Keep sprinklers off the wall for 48 hours.
- Wash with mild soap only. No harsh chemicals for 7 days.
- Re-seal high-traffic walls every 2–3 years, or when water stops beading.
Pricing, Proposals, and Client Sign-Off
On most jobs, clear pricing and fast approvals win the work.
- Estimate material by coverage: 150–300 sq ft/gal per coat.
- Add labor time for prep: 1–2 hours for masking and cleaning per 500 sq ft.
- Include mobilization, protection, and cleanup as separate lines.
- Spell out number of coats, product type, and cure times.
You can capture site details fast using tools like Donizo. Record notes with Voice to Proposal, attach photos, and send a branded PDF for e-signature. After approval, convert it to an invoice in one click. This keeps change orders and add-ons crystal clear.
Internal linking opportunities to help your readers:
- If you’re also looking to streamline professional proposals, our guide covers proven formats.
- For contractors dealing with project timelines, see planning tips that prevent rework.
- Need invoice templates that save time? Check simple structures clients understand.
Troubleshooting and Common Mistakes
- Blushing or whitening: Usually trapped moisture. Improve drying. Use breathable sealer next time.
- Peeling: Poor prep or over-application. Strip failing areas, prep right, apply thin coats.
- Lap marks: Moving too slow or inconsistent overlap. Keep 50% overlap and a steady pace.
- Dry spray (rough, powdery): Spraying too far away or in wind. Move closer, lower wind exposure.
- Orange peel: Too high viscosity or low pressure. Thin per label or raise PSI slightly.
- Streaks on CMU: Porous block absorbing unevenly. Prime or backroll first coat.
Remember: The Concrete Sealer Spray Process That Makes Walls Look Brand New depends on thin coats, dry substrate, and steady technique.
Conclusion
A clean, dry wall plus thin, even coats is the winning formula. Follow the concrete sealer spray process here, and you’ll deliver a uniform finish that truly looks brand new. Next steps: 1) Walk the wall and plan repairs, 2) Confirm tip size, PSI, and coverage, 3) Spray two light coats and respect cure times. For faster approvals and clear paperwork, platforms such as Donizo help you capture details, send proposals, get e-signatures, and invoice in one flow. Put this process to work on your next job, and let the results speak for themselves.