Intro
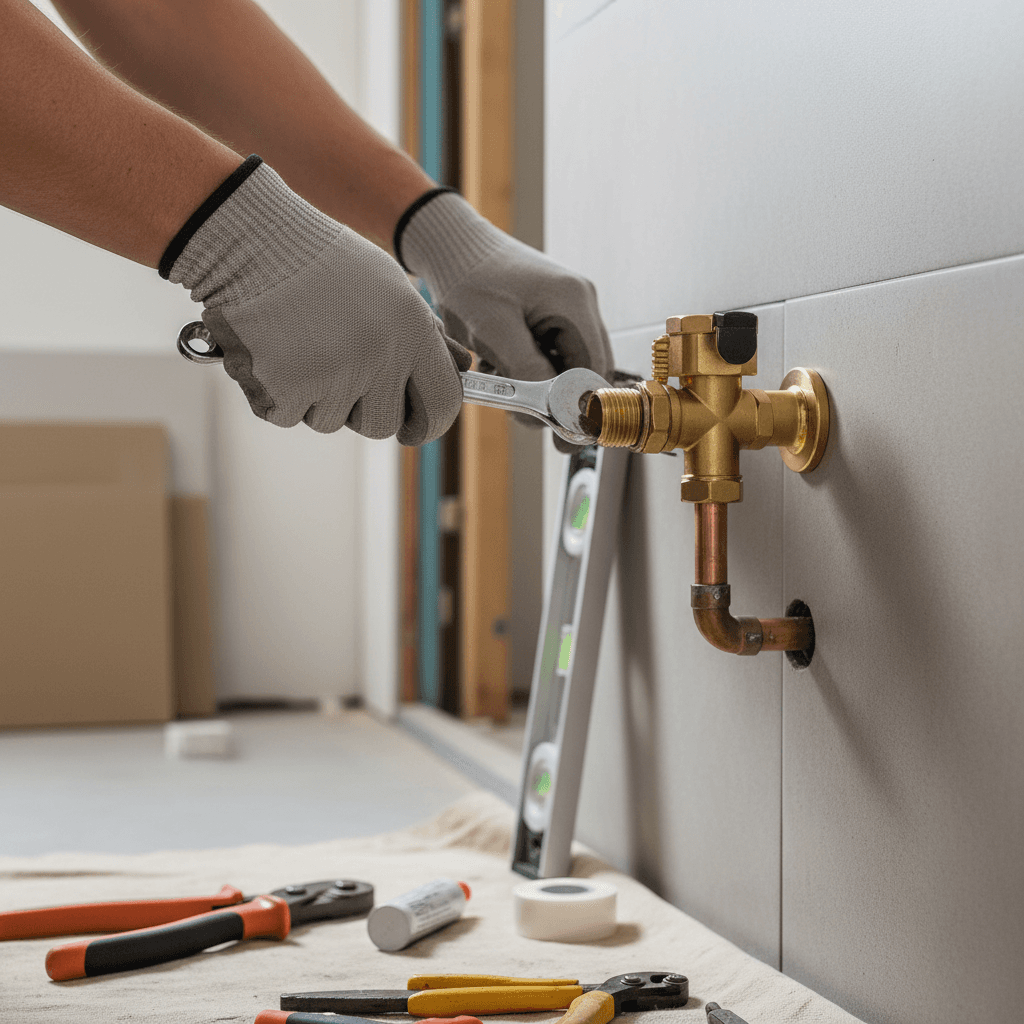
On many jobs, a loose faucet means one thing: a callback. A wall-anchored faucet connector stops that. It locks the body and supply in the wall, so the trim stays solid. In this guide, you’ll learn how to install a wall-anchored faucet connector for secure plumbing installation. We’ll cover planning, tools, steps, testing, and pricing. You’ll see common mistakes and easy fixes. Follow this once, and your faucet stays tight for years.
Quick Answer
A wall-anchored faucet connector for secure plumbing installation braces the faucet to framing or a bracket, not just drywall. It uses a solid anchor, a drop-ear or bracketed body, and proper connector lengths. Set the depth, strap to structure, pressure test at 50–80 psi, and finish. Done right, it prevents wobble and leaks.
Table of Contents
- Why Wall-Anchored Connectors Matter (#why-wall-anchored-connectors-matter)
- Plan, Code, and Layout (#plan-code-and-layout)
- Tools and Materials (#tools-and-materials)
- Step-by-Step Installation (#step-by-step-installation)
- Test and Commission (#test-and-commission)
- Common Mistakes and Fixes (#common-mistakes-and-fixes)
- Pricing and Paperwork Tips (#pricing-and-paperwork-tips)
- FAQ (#faq)
- Conclusion (#conclusion)
Key Takeaways
- Anchor to framing, not drywall, for a rigid faucet body.
- Set precise depth; protect trim clearances by 1/8–1/4 inch.
- Pressure test at 50–80 psi before closing walls.
- Use 6–8 PTFE wraps and 1/4 turn past hand-tight.
Why Wall-Anchored Connectors Matter
A faucet that moves will leak. It also cracks caulk and loosens escutcheons. A wall-anchored faucet connector for secure plumbing installation ties the valve body or drop-ear elbow to framing. The force from handles and hoses goes into wood or steel. Not into drywall. That’s the whole game.
On most jobs, you’ll see stud bays at 16 in on center. Use that to your advantage. Span a brace. Strap your valve. Set the body depth accurately. This simple setup saves you from rework and frustrated clients.
Plan, Code, and Layout
Good work starts with a layout. Mark centerline, height, and trim clearances. For lavs, centers are commonly 8–10 in above the countertop. Check your spec sheet. Every faucet body has a finished-wall depth range. Aim for the middle of that range.
- Follow local code for pipe materials, supports, and valve access.
- Use shutoff stops where required. Some jurisdictions demand accessible stops.
- Keep clear of electrical. Maintain safe separation per code.
A wall-anchored faucet connector for secure plumbing installation only works if the backing is solid. Add a 2x4 or steel bracket if there’s no stud. Pre-drill. Use 2-1/2 in structural screws. You want bite, not spin.
You don’t need much, but the right pieces matter.
- Anchoring: 2x4 brace or metal bracket, strap, and 2–4 screws (2-1/2 in).
- Valve/Elbows: Drop-ear elbows or a bracketed valve body (1/2-in NPT typical).
- Connectors: Supply lines sized to faucet tailpieces (often 3/8-in OD).
- Sealants: PTFE tape (6–8 wraps) and pipe dope if approved.
- Measuring: Level, tape, and depth gauge or scrap trim as a gauge.
- Cutting: Hole saw (often 1–3/8 in), oscillating tool for notches.
- Pressure: Test gauge and pump, or water at 50–80 psi.
A wall-anchored faucet connector for secure plumbing installation is more about accuracy than fancy tools. A good level and a steady hand beat shortcuts every time.
Step-by-Step Installation
Follow these steps to get a clean, solid result.
-
Mark the Layout
- Mark centerline and valve height. Dry-fit trim to confirm handle swing.
- Note finished wall thickness. Add tile, board, and mud to your math.
-
Add Backing
- Install a 2x4 brace between studs. Keep it level.
- Secure with two 2-1/2 in screws per side. No wobble.
-
Mount the Valve or Drop-Ear Elbows
- Set the body depth to the spec. Aim mid-range for safety.
- Strap or screw ears to the brace. Keep outlets plumb and level.
- For NPT threads, wrap 6–8 PTFE wraps clockwise. Dope if allowed.
-
Run Supplies
- Use 1/2-in lines to the body. Keep lines supported per code.
- Avoid hard 90° kinks in flexible connectors. Gentle sweeps are better.
-
Pressure Test the Rough
- Cap outlets. Pressurize to 50–80 psi for 10–15 minutes.
- Fix any weeps now. Don’t bury a problem.
-
Close the Wall and Drill Trim Holes
- After inspection, board and tile. Drill clean holes, often 1–3/8 in.
- Keep a 1/8–1/4 in gap for caulk around trim.
-
Set the Trim and Connect Supplies
- Hand-tighten connectors. Then add 1/4 turn with a wrench.
- Check orientation. No twist on hoses.
A wall-anchored faucet connector for secure plumbing installation is won or lost in steps 2–3. Get the backing right and the body square. You’ll feel the difference when you tighten trim.
Test and Commission
Testing is not a formality. It saves your day.
- Pressure Test: 50–80 psi for 10–15 minutes. No drops, no weeps.
- Function Test: Full hot and cold cycles. Watch for handle torque movement.
- Flow Check: Verify aerator flow and clean debris.
If the faucet moves even 1/16 in under handle force, re-check your anchor. A proper wall-anchored faucet connector for secure plumbing installation should feel rock solid.
Common Mistakes and Fixes
-
Loose Backing
- Problem: Screws in drywall only. Valve shifts.
- Fix: Add a 2x4 brace. Use structural screws into studs.
-
Wrong Depth
- Problem: Trim won’t seat or handle rubs tile.
- Fix: Use a depth gauge. Aim mid-spec. Shim bracket if needed.
-
Over-Tightening
- Problem: Cracked fittings or distorted gaskets.
- Fix: Hand-tight plus 1/4 turn. Stop at resistance.
-
Kinked Connectors
- Problem: Restricted flow, noise, early failure.
- Fix: Use proper length. Route smooth. No hard bends.
-
Skipping the Test
- Problem: Hidden weeps, callbacks.
- Fix: Always test at 50–80 psi before finish. No exceptions.
Each of these errors defeats a wall-anchored faucet connector for secure plumbing installation. Slow down. Check your steps.
Pricing and Paperwork Tips
Small fixture jobs can eat time. Scope creep kills margin. Write a clear proposal that lists:
- Fixture type and finish
- Backing or bracket install
- Valve/connector materials
- Testing and caulking
- Patch/paint exclusions if others handle finish
Tools like Donizo help here. Capture site details with voice notes and photos. Turn them into a clean proposal in minutes. When the client says yes, use e-signature and convert to an invoice in one click. For internal linking, this pairs well with content on professional proposals, project timelines, and invoice templates.
A wall-anchored faucet connector for secure plumbing installation is easy to explain in a scope line. Clients understand “solid backing and braced valve to prevent wobble.” That line alone justifies your price.
Conclusion
A stable faucet starts inside the wall. Brace the body, set depth, and test. That’s the core of a wall-anchored faucet connector for secure plumbing installation. Next steps: 1) Add backing on your next rough-in, 2) Use a depth gauge, and 3) Pressure test before finish. To keep your paperwork tight, platforms such as Donizo let you capture site details, send branded proposals, get e-signatures, and invoice fast. Build it right once, and skip the callbacks.