Intro
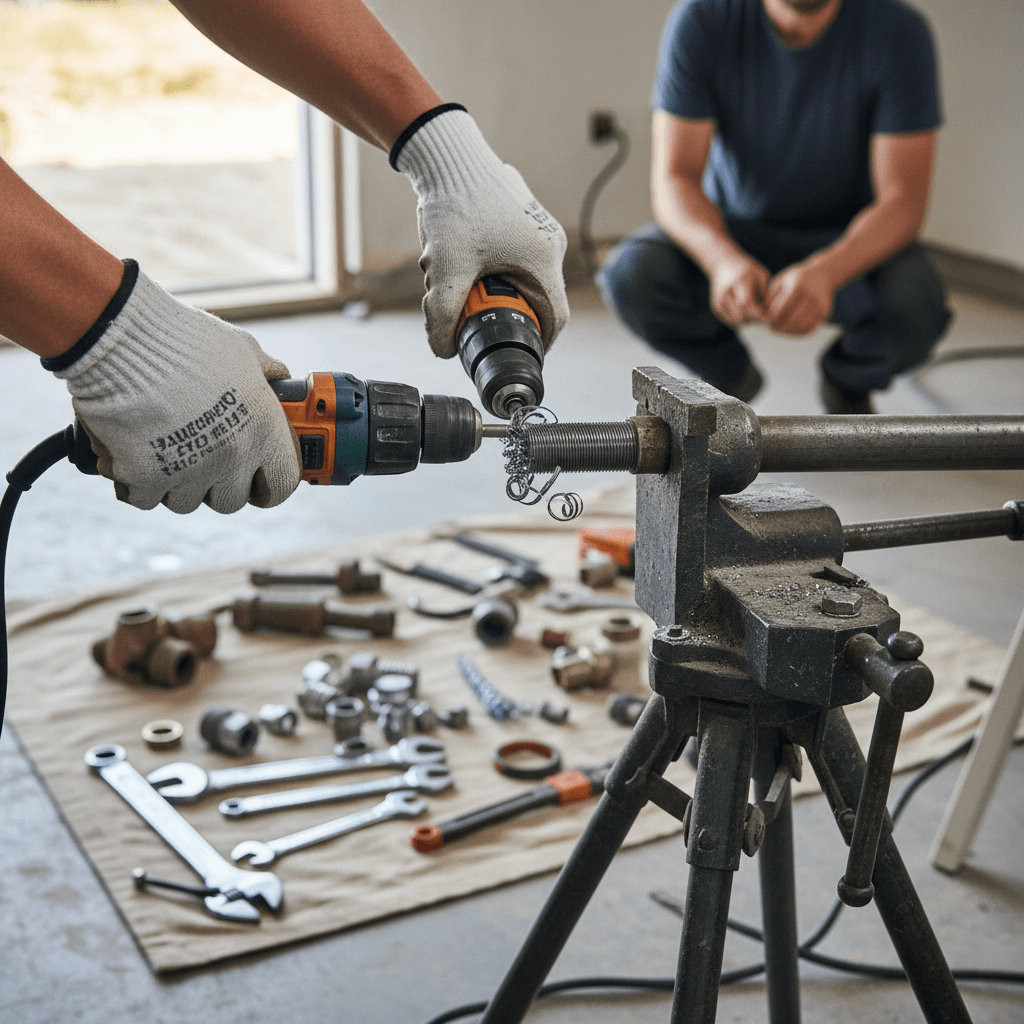
On most jobs, you don’t have time to haul a big threader upstairs. That’s why many pros use a drill with a die head to cut threads fast. If you’ve searched for “Tesisat İşlerinde Pratik Çözüm Matkap Ucuyla Boruya Diş Açma,” this guide shows the full, safe method. We cover tools, RPM, oiling, thread standards, leak tests, and smart workflow. You’ll see how to keep cuts clean, avoid cross‑threading, and finish joints in 3–5 minutes. Let’s get you reliable threads without dragging heavy gear.
Quick Answer
You can cut clean, tapered pipe threads with a variable‑speed drill, a quality die head, and proper cutting oil. Run slow (about 60–120 RPM), apply oil every 1–2 turns, back off to break chips, and stop when you have 7–10 full threads. Deburr, seal, tighten, and leak‑test. It’s fast, safe, and reliable.
Table of Contents
Key Takeaways
- A drill at 60–120 RPM with oil can cut threads in 3–5 minutes per joint.
- Bevel 1–2 mm on the pipe end to start the die cleanly and avoid cross‑threading.
- Aim for 7–10 full threads and test at 3–5 bar for 10 minutes (follow local code).
- Use 6–8 PTFE wraps on 1/2" and 8–10 on 1" threads, or apply a thin dope layer.
- Keep dies sharp; back off half a turn often to break chips and protect the die.
Why Use a Drill for Threading
When you’re on site, big machines slow you down. A drill and die head fit in a small bag and get into tight spots. For “Tesisat İşlerinde Pratik Çözüm Matkap Ucuyla Boruya Diş Açma,” the drill method is fast, portable, and accurate when done right. You can cut 1/2", 3/4", and 1" threads without moving the pipe to a station. That saves you trips and protects your schedule.
- Variable‑speed drill with side handle and 13 mm chuck (50–90 Nm torque)
- Right‑angle drill helps in tight rooms
- Threading die head set: 1/2", 3/4", 1" (NPT and/or BSPT, as needed)
- Cutting oil (sulfurized or pipe threading oil)
- Pipe cutter or saw, reamer, and file for beveling
- Vise or robust clamp to lock the pipe
- PTFE tape (6–10 wraps range) or pipe dope
- PPE: gloves, eye protection, snug sleeves
For “Tesisat İşlerinde Pratik Çözüm Matkap Ucuyla Boruya Diş Açma,” quality dies and steady clamping matter more than raw drill power. Sharp, clean dies make smoother threads.
Step-by-Step: Drill-Assisted Threading
Follow these steps for consistent results.
-
Measure and Cut
- Cut the pipe square. Clean burrs inside and out.
- Bevel the edge 1–2 mm at about 30–45°. This helps the die start true.
-
Clamp Solid
- Lock the pipe in a vise or clamp it to a sturdy surface.
- The pipe must not spin. A slipping pipe is dangerous and ruins threads.
-
Prepare the Die
- Pick the right die: 1/2", 3/4", or 1"; confirm NPT or BSPT.
- Oil the die teeth lightly before starting.
-
Set the Drill
- Low gear. Target 60–120 RPM. Slower is safer at larger sizes.
- Use the side handle. Keep wrists straight.
-
Start the Cut
- Square the die to the pipe. Apply light forward pressure.
- After 1–2 turns, add cutting oil. Keep the teeth wet.
-
Cut and Break Chips
- Turn 1–2 rotations, then back off half a turn to break chips.
- Repeat: turn, oil, back off. This protects the die and cleans the cut.
-
Watch Depth
- For typical 1/2" to 1": aim for 7–10 full threads visible.
- Many dies have a depth mark; stop at the mark for taper threads.
-
Clean and Deburr
- Pressurize to a safe level (often 3–5 bar for a quick check; follow local code).
- Hold 10 minutes. Look and listen for leaks. Re‑seal if needed.
This is the core of “Tesisat İşlerinde Pratik Çözüm Matkap Ucuyla Boruya Diş Açma.” Keep RPM low, feed steady, and oil often for clean, repeatable threads.
Sizes and Standards: NPT vs BSPT
Getting the standard wrong means leaks. Here’s the simple breakdown:
-
NPT (National Pipe Taper)
- Common in North America. Tapered, 60° thread form.
- Typical TPI: 1/2" = 14 TPI, 3/4" = 14 TPI, 1" = 11.5 TPI.
-
BSPT (British Standard Pipe Taper)
- Common in many regions and on imported valves. 55° thread form.
- Typical TPI: 1/2" = 14 TPI, 3/4" = 14 TPI, 1" = 11 TPI.
Tips:
- Match the die to the fitting. Don’t mix NPT and BSPT.
- Keep both die sets if your work crosses standards.
- Mark your die cases clearly: bold paint for quick ID.
For “Tesisat İşlerinde Pratik Çözüm Matkap Ucuyla Boruya Diş Açma,” standard matching is just as critical as a clean cut.
Safety, Quality, and Leak Tests
Safety first:
- Wear eye protection. Chips are sharp and hot.
- Use the side handle. A jam can twist your wrist.
- Clamp the pipe. Never freehand.
Quality checks:
- Threads should look even, shiny, and free of tearing.
- Fitting should start by hand for 2–3 turns without binding.
- If it cross‑threads, stop. Re‑cut after re‑beveling the start.
Leak tests:
- Do a quick low‑pressure check (often 3–5 bar for 10 minutes). Follow local code for final tests.
- Over‑tight isn’t better. It can split thin fittings. Aim for snug + 1/4 to 1/2 turn.
These habits make “Tesisat İşlerinde Pratik Çözüm Matkap Ucuyla Boruya Diş Açma” dependable on every project.
Time and Cost Tips On Site
- Prep in batches: cut, bevel, and stage 4–6 pieces before threading.
- Oil is cheap. Dies are not. Keep oil on the teeth every 1–2 turns.
- Sharpen or replace dies after you notice heavy tearing. Many crews rotate dies every 300–500 cuts.
- Store dies dry. Wipe and oil lightly after use.
- Track your time per joint. A good target is 3–5 minutes from start to seal on 1/2".
Paperwork matters too. After you finish “Tesisat İşlerinde Pratik Çözüm Matkap Ucuyla Boruya Diş Açma,” capture notes, voice, and photos on site, then turn them into clean proposals and invoices fast. Tools like Donizo help you go from voice to proposal, get e‑signatures, and convert accepted work into invoices in one click.
Pro tip for internal learning:
- If you’re also refining professional proposals, link to your in‑house “professional proposals” guide.
- Pair this with a “project timelines” piece for scheduling.
- Add a link to “invoice templates that save time” for admin speed.
- Cross‑reference a “change orders” article to protect margin.
Conclusion
Drill‑assisted threading is fast, portable, and reliable when you control speed, oil, chip break, and depth. Use a sharp die, bevel 1–2 mm, cut at 60–120 RPM, and aim for 7–10 full threads. That’s “Tesisat İşlerinde Pratik Çözüm Matkap Ucuyla Boruya Diş Açma” done right. Next steps: 1) Stage and clamp properly, 2) Standard‑check NPT/BSPT, 3) Leak‑test every joint. For paperwork, platforms such as Donizo let you capture site details by voice, send branded proposals, get e‑signatures, and invoice fast. Keep it simple, stay safe, and deliver clean, leak‑free work every time.