Intro
On most jobs, pipe support makes or breaks your day. If hangers slip or sag, you lose time and money fixing it. This guide shows how to plan, choose, and install HAP pipe hangers the right way. We lean on the promise: HAP Pipe Hangers: Built Strong. Certified. Trusted. You will learn spacing, rod sizes, code tips, and inspection steps. Follow the steps, and your lines stay straight, quiet, and safe.
Quick Answer
HAP Pipe Hangers: Built Strong. Certified. Trusted. means reliable hardware that holds load, meets code, and installs fast. Pick the right hanger, space supports correctly, and torque hardware snug plus a quarter turn. Inspect within 24 hours and again before close-up. Do this, and your pipe stays put.
Table of Contents
Key Takeaways
- Use the right hanger for pipe size (1/2 in to 12 in) and material.
- Common spacing: PVC 4 ft, copper 6 ft, steel 8–10 ft. Check specs.
- Place supports within 12 in of valves, tees, and changes in direction.
- Rod sizes: 3/8 in for light runs, 1/2 in for heavier or long drops.
- Inspect after 24 hours and again before ceilings close.
Why HAP Pipe Hangers: Built Strong. Certified. Trusted.
You want hardware that will not fail. HAP Pipe Hangers: Built Strong. Certified. Trusted. tells you three things. First, the steel and finishes handle real jobsite loads. Second, listed and certified parts match code calls. Third, crews can trust repeatable installs, day after day.
Hangers do more than hold pipe. They keep slopes true, reduce noise, and protect joints. Good hangers keep alignment through heat cycles and shocks. That prevents callbacks and leaks.
What “Built Strong” Means On Site
- Thick steel, clean threads, and true bends.
- Nuts start easy and tighten smooth.
- Coatings resist rust during long builds.
What “Certified” Means For You
- Recognized listings that inspectors accept.
- Clear load data you can show in submittals.
- Compatibility with fire, plumbing, and mechanical codes.
What “Trusted” Means For Crews
- Parts fit right out of the box.
- Same sizes match from lot to lot.
- You hit layout marks without fighting hardware.
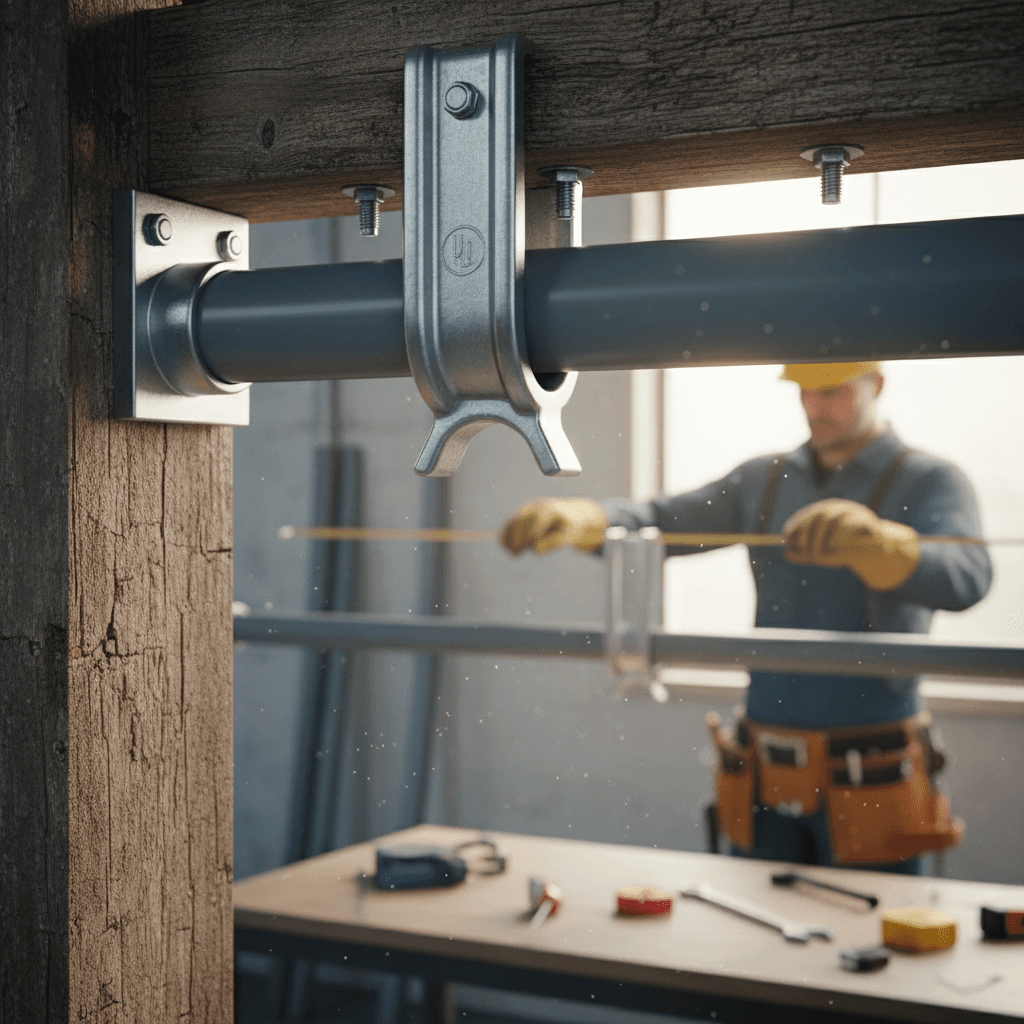
Choosing the Right HAP Pipe Hanger
Picking the wrong hanger costs hours. Use this simple path.
- Identify pipe material and size.
- Common sizes run from 1/2 in up to 12 in.
- Hot lines grow. Allow for movement.
- Match hanger type to the job.
- Clevis for general steel or copper.
- Insulated clamps for chilled or hot with insulation.
- Roller or slide for expansion on long runs.
- Riser clamps for vertical stacks.
- Pick the rod and anchor.
- 3/8 in rod for light domestic lines and short drops.
- 1/2 in rod for larger diameters or drops over 3–4 ft.
- Use anchors rated above your calculated load. Follow the anchor maker’s data.
- Plan spacing.
- In general: PVC every 4 ft, copper every 6 ft, steel every 8–10 ft.
- Place a support within 12 in of heavy fittings and valves.
- For sloped drains, check grades every 10–20 ft.
Tip: If you are also working on creating professional proposals, consider linking the phrase "professional proposals" to your related resource.
Installing HAP Pipe Hangers: Built Strong. Certified. Trusted.
Here is a clean, repeatable method crews can follow.
- Snap lines and mark supports.
- Mark every 4–10 ft based on material.
- Mark within 12 in of valves, tees, and turns.
- Drill and set anchors.
- Follow drill size and depth on the anchor box.
- Many crews embed wedge anchors at least 1-1/2 in. Check data.
- Cut and hang rod.
- Keep rods plumb within 1/8 in over 4 ft.
- Leave 1/2–1 in adjustment thread below the nut.
- Install the hanger body.
- Set clevis or clamp to height. Do not overtighten.
- Tighten to snug, then add 1/4 turn for security.
- Set the pipe and check slope.
- For drains, hold 1/8–1/4 in per foot slope.
- Recheck after the full section is supported.
- Lock and label.
- Double-nut critical drops.
- Tag expansion points and seismic braces where required.
This keeps the promise: HAP Pipe Hangers: Built Strong. Certified. Trusted.
In general, a two-person crew can hang 200–300 ft per day, depending on ceiling type. Plan 30–45 minutes for every 100 ft of layout and drilling in clean deck.
Code, Certification, and Inspection Tips
Inspectors want three things: the right product, the right spacing, and good attachment.
- Submittals: Include listings and load tables. HAP Pipe Hangers: Built Strong. Certified. Trusted. documentation helps you pass first review.
- Fire and seismic: Where required, add sway braces and restraints per the engineer. Space braces commonly every 12–20 ft on long runs, per design.
- Thermal movement: On hot lines, use slides or rollers at expansion points. Fix one anchor point and let others move.
- Corrosion: In wet areas, use galvanized or coated hangers. Keep dissimilar metals separated with liners.
- Clearance: Maintain at least 1 in from structure or other services where possible.
Tip: This pairs well with understanding "project timelines" for hanger installation and inspection windows.
Common Mistakes and How to Avoid Them
- Over-tightening clamps: It crushes insulation and buzzes copper. Tighten snug plus 1/4 turn.
- Wrong spacing: Sag shows in days. Follow 4/6/8–10 ft rules and verify.
- Short thread engagement: Keep 3–4 full threads past nuts.
- No support at valves: Add a hanger within 12 in of each heavy fitting.
- Skipping expansion details: Use a slide or roller on hot or long runs.
- Mixing metals: Use isolators between copper and steel hangers.
Remember the standard: HAP Pipe Hangers: Built Strong. Certified. Trusted. It only works if the install matches the spec.
Documenting and Presenting Your Hanger Plan
Good paperwork wins approvals fast and protects you if things change.
- Create a simple hanger schedule with size, type, spacing, and rod size.
- Add a one-page detail showing 3/8 in and 1/2 in rod options.
- Include expansion notes and where you need slides or rollers.
- Attach manufacturer listings and load data.
Many contractors capture these details using tools like Donizo. Voice to Proposal lets you record sizes, spacing, and anchor notes on site. You can send a branded PDF for sign-off and use e-signatures for clear acceptance. If you price work by fixture or foot, consider linking "pricing strategies" and "invoice templates" to your related guides.
HAP Pipe Hangers: Built Strong. Certified. Trusted. makes the technical side easy to defend. Clean documents make approvals even faster.
Conclusion
Strong, listed hardware plus clean install steps equals fewer callbacks. HAP Pipe Hangers: Built Strong. Certified. Trusted. gives you the backbone. Your part is picking the right hanger, setting correct spacing, and inspecting before close-up. Next steps:
- Build a hanger schedule by size, spacing, and rod.
- Walk the run, mark supports, and verify clearances.
- Package a one-page submittal and get sign-off.
If you want faster approvals, platforms such as Donizo help you capture details on site, send proposals, and collect signatures. Install with confidence and keep your lines tight and true.