Intro
On most jobs, valves slow you down. You fight alignment, heat, and leaks. This guide shows a new method for installing valves that cuts time and hassle. We call it the press-and-proof method. It uses press or push fittings, isolation unions, and quick testing. You’ll see fewer callbacks and faster closeouts. We cover tools, torque, test pressure, and step-by-step work. If you want clean installs and tight schedules, this new method for installing valves delivers.
Quick Answer
The new method for installing valves is a press-and-proof workflow: pre-assemble the valve with unions, mark insertion depth, make the press or push connections, torque the union, and proof with a 150 psi, 15-minute pressure test. Most valves install in 12–18 minutes with consistent, leak-free results.
Table of Contents
Key Takeaways
- Expect 12–18 minutes per valve with the press-and-proof workflow.
- Pressure test at 150 psi for 15 minutes to confirm no drops.
- Torque union nuts to 18–25 ft‑lb for a reliable seal.
- Keep 1.5× pipe diameter of straight run on each side for flow.
Why This New Method For Installing Valves Works
Traditional installs mean heat, flux, and long cool-downs. Press tools or push fittings cut those steps. You press for 4–6 seconds. You’re done.
Unions on one or both sides let you center the valve body and control strain. You avoid twisting pipes. You also make swaps fast during service.
A quick proof test right after pressing gives you confidence. You find leaks now, not after drywall. That’s why this new method for installing valves reduces callbacks.
This approach is clean in finished spaces. No flames. No scorch marks. It’s safer around wood and insulation.
If you’re also looking to streamline professional proposals, our guide covers scoping, parts lists, and pricing under the anchor text “professional proposals.”
You don’t need much. But the right kit matters.
- Press tool with 1/2 in, 3/4 in, and 1 in jaws (match pipe size)
- Valve with union ends or add union adapters (same metal as the system)
- Depth gauge and marker (mark 1 in insertion on copper; follow spec on PEX)
- Deburr tool and brush or cloth (clean, bright metal; square cuts on PEX)
- Torque wrench with crowfoot (18–25 ft‑lb target for many union nuts)
- Test pump or nitrogen bottle with regulator and gauge (0–300 psi range)
- Temporary test caps or plugs
Before you start:
- Confirm flow direction and handle clearance. Leave 3/16 in gap to allow for expansion on long runs.
- Check code and manufacturer requirements. Some valves need support within 12 in of the body.
- Pre-assemble the valve and unions on the bench. Hand-tight only for now.
Tip: On walk-throughs, capture the valve schedule and photos with tools like Donizo. Voice notes become a clean proposal fast, so you price every valve correctly.
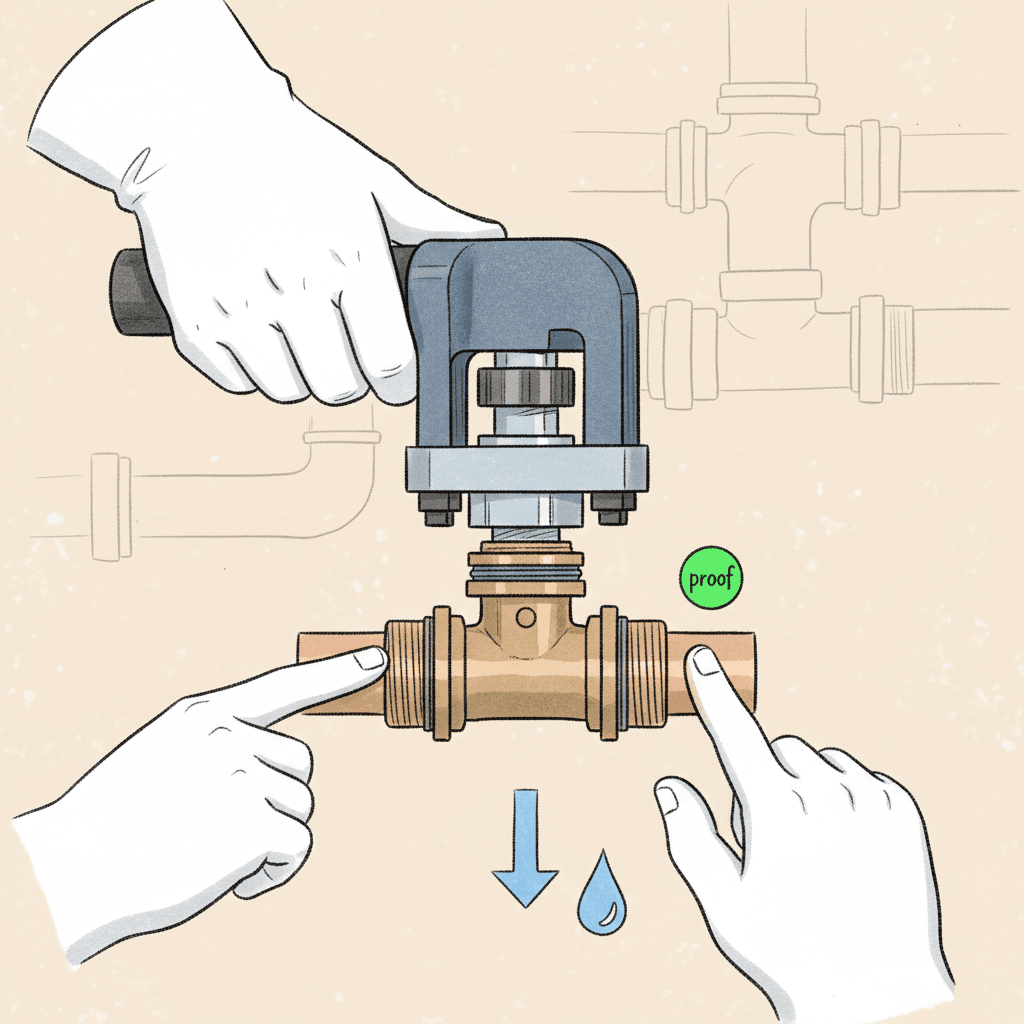
New Method For Installing Valves: Step-By-Step
Follow these numbered steps. This is the core of the new method for installing valves.
-
Isolate And Drain
- Shut the branch. Open a downstream tap. Drain and depressurize fully. Verify zero pressure on the gauge.
-
Measure And Mark
- Dry-fit the valve. Mark pipe cut points. Keep at least 1.5× pipe diameter of straight pipe on each side when possible.
-
Cut And Prep
- Cut square. Deburr inside and outside. Clean copper to bright metal. For PEX, use an approved cutter and insert stiffeners if required.
-
Depth Marking
- Use a depth gauge. Mark 1 in insertion on copper press sockets (or per fitting spec). Do not skip this.
-
Press/Push One Side
- Seat the fitting to the mark. Align the valve handle orientation. Make the first press (4–6 seconds). With push fittings, confirm to the depth mark.
-
Align And Support
- Center the valve body. Add a hanger within 12 in if needed. Avoid side-load on the union.
-
Install Union And Second Press
- Hand-tighten the union nut. Make the second press on the opposite side. Then torque the union nut to 18–25 ft‑lb. Do not over-torque.
-
Proof Test
- Cap outlets. Pressurize to 150 psi. Hold 15 minutes. Zero drop means you’re good.
-
Operate And Label
- Add final hangers. Keep the valve handle clear 1 in from nearby surfaces.
If you manage project timelines, pair this with our anchor text “project timelines” for scheduling crews around test windows.
Testing, Commissioning, And Documentation
Proof testing is non-negotiable. Many contractors test at 150 psi for 15 minutes on domestic water. For hydronic, match design pressure and local code.
- Use water or nitrogen. Nitrogen is clean in cold weather.
- Soap test at union and stem packing. Look for any bubbles.
- Record pressure, start time, end time, and valve ID.
Closeout packet:
- Valve list with locations
- Photos of gauges during test
- Torque values noted for unions
- Maintenance notes: cycle quarterly
Send the packet with your invoice. If you use platforms such as Donizo, you can send a branded proposal, get e-sign approval, and convert to an invoice in one click.
For contractors dealing with change orders, we recommend anchor text “change orders” to explain added valves or scope shifts.
Common Mistakes And How To Avoid Them
-
Skipping depth marks
- Result: Shallow insert, weak press, leaks later. Always mark.
-
Twisting during press
- Result: Oval seal failure. Hold alignment steady. Use supports.
-
Over-torquing unions
- Result: Cracked seat or deformed gasket. Stay near 18–25 ft‑lb.
-
No support near the valve
- Result: Body strain and noise. Add a hanger within 12 in.
-
Testing too fast
- Result: Missed micro-leaks. Hold 15 minutes, watch the needle.
-
Mixing metals without isolation
- Result: Corrosion risk. Match materials or use dielectric unions.
This pairs well with understanding anchor text “invoice templates” so you bill labor and material lines clearly.
Cost, Time, And When Not To Use It
Time: Expect 12–18 minutes per 1/2–3/4 in valve once you’re set up. Larger than 1 in may take 20–30 minutes.
Cost: Press fittings cost more than sweat. But you save an hour or more on multi-valve runs. Many contractors report fewer callbacks.
When not to use:
- High-temperature steam or specialty chemicals outside fitting ratings
- Historic systems where owners require brazed joints
- Situations needing flanged valves for future equipment alignment
In those cases, stick with the spec. Or use unions only for serviceability.
Conclusion
The new method for installing valves is simple: press, union, and proof. You work faster, avoid heat, and verify every joint the same day. Start with one crew and track average install time.
Next steps:
- Standardize a valve kit with unions, caps, and a depth gauge.
- Set your test plan: 150 psi, 15 minutes, photos recorded.
- Add proposal language that explains your test and warranty.
When you’re ready, tools like Donizo help you capture valve scopes by voice, send branded proposals for e-sign, and invoice in one click. Build the habit. You’ll see fewer leaks and smoother closeouts.