Intro
On most roofs, the chimney is the first place water finds a way in. Professional Chimney Flashing and Roof Integration fixes that. It means tight step flashing, proper aprons, a real cricket, and clean counterflashing that locks into the masonry. Done right, it sheds water and moves with the building. This guide shows what to use, how to cut, where to lap, and how to test. Follow these steps for Professional Chimney Flashing and Roof Integration and you’ll stop leaks, cut call-backs, and build trust with every client.
Quick Answer
Professional Chimney Flashing and Roof Integration uses step flashing, apron/head pieces, a cricket on wider chimneys, ice-and-water membrane, and reglet-set counterflashing. Laps are at least 2 inches, reglet is cut about 1 inch deep, and the system is water-tested for 10–15 minutes. Do this, and chimney leaks stop.
Table of Contents
Key Takeaways
- Use a cricket on chimneys 30 inches or wider.
- Lap step flashing at least 2 inches; cut reglet about 1 inch deep.
- Run ice-and-water membrane 18–24 inches around the chimney.
- Water-test for 10–15 minutes, working upslope.
- Standard installs take 4–6 hours; complex jobs can take a full day.
Why Chimneys Leak: The Real Culprits
Most leaks start with bad transitions. Missing step flashing, shallow counterflashing, and no cricket are common. Mortar joints crack. Sealant fails. Water wicks under shingles and rides the chimney.
What to look for:
- No cricket behind a wide chimney (30 inches or more). Water piles up here.
- Step flashing nailed to the deck and exposed. It should be woven and covered.
- Counterflashing only surface-sealed. It must be cut into a reglet.
- Old tar patches. Tar is a short-term bandage, not a fix.
Fix the root with Professional Chimney Flashing and Roof Integration, not more goop.
Materials And Prep For Professional Chimney Flashing and Roof Integration
Get the right gear before you start. It saves hours.
Materials
- Step flashing: 26-gauge galvanized steel or 16 oz copper. Typical size 8x8 inches.
- Apron (front) and head (back) flashing: same metal. Head piece often 10–12 inches upslope.
- Counterflashing: matching metal; 4–6 inch vertical leg is common.
- Membrane: self-adhered ice-and-water shield. Run 18–24 inches beyond the chimney.
- Fasteners: stainless or hot-dip galvanized roofing nails. Do not nail visible flashing faces.
- Sealant: high-quality polyurethane or butyl. Use a 3/8 inch bead in reglets.
- Mortar repair: type N or S for joints as needed.
Tools
- Angle grinder with diamond blade for reglets (dust control where required).
- Tuckpointing chisel and jointer.
- Metal snips and hand brake.
- Tape, chalk line, and square.
- Caulk gun, hammer, nail set.
- PPE: eye protection, gloves, dust mask or respirator.
Prep Steps
- Strip shingles 12–18 inches around the chimney.
- Inspect sheathing; replace rot. Check for a vapor path and proper intake/exhaust.
- Clean mortar joints 3/4–1 inch deep where counterflashing will sit.
- Dry-fit your cricket if needed.
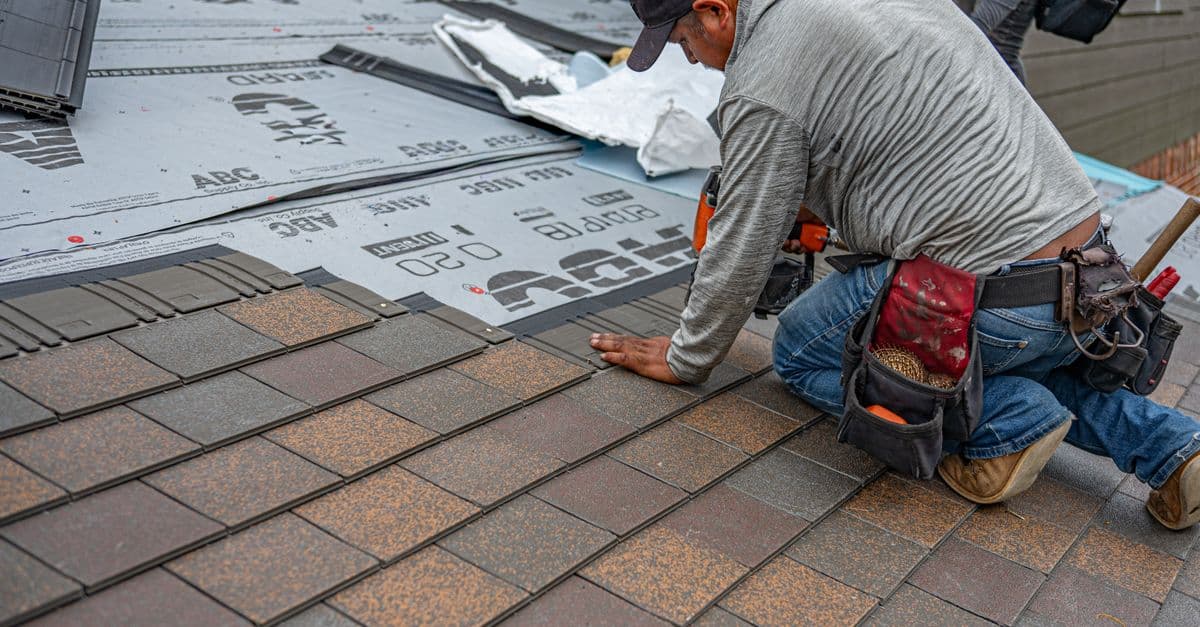
Step-By-Step: Professional Chimney Flashing and Roof Integration
Follow these steps for Professional Chimney Flashing and Roof Integration that lasts.
- Install Membrane Base
- Prime dusty decks if needed. Run ice-and-water shield tight to all chimney sides.
- Extend 18–24 inches onto the roof and 6 inches up the chimney if allowed.
- Build The Cricket (If Chimney ≥ 30 Inches)
- Use 2x framing. Slope at least 1/2 inch per foot to split water.
- Sheath and cover with membrane. Cap with metal or integrate under head flashing.
- Set The Front Apron
- Bend an apron with a 4–6 inch vertical leg and 4–8 inch horizontal leg.
- Lap at least 2 inches over shingles. Nail only along the top flange into the deck.
- Weave Step Flashing (Sides)
- Use 8x8 inch pieces. Each piece overlaps the previous by 2 inches minimum.
- Each shingle gets its own step piece. Nail high and toward the back corner, covered by the next shingle. Do not face-nail the flashing.
- Install Head Flashing (Back)
- Run at least 10–12 inches upslope. Tie into or cover the cricket.
- Turn ends 1 inch up the sides to form end dams that block backflow.
- Cut The Reglet
- Mark a clean line in mortar, not brick. Cut 3/4–1 inch deep.
- Keep cuts level. Avoid soft or loose mortar; repoint as needed.
- Fit Counterflashing
- Bend to drop into the reglet with a 1/2–3/4 inch return bend.
- Maintain a 1/2 inch gap above the apron/step/head so metal can move.
- Seal The Reglet
- Tool a 3/8 inch polyurethane bead. Press counterflashing into the cut.
- Do not smear sealant over faces. Clean, single bead inside the reglet is best.
- Lock Corners And End Dams
- Solder copper, or hem and rivet steel/aluminum. Create tight overlaps.
- Maintain 2 inch overlaps at all seams.
- Re-Shingle And Counterflash Weave
- Shingles cover step flashing with proper exposures. Keep 4–6 inch side laps away from flashing seams.
- Leave 3/4–1 inch of vertical flashing leg visible above shingles.
- Final Seal And Clean
- Small bead at reglet terminations only. No goop baths.
- Brush debris. Check for sharp edges and exposed fasteners.
Timeframe: A standard chimney takes 4–6 hours with two workers. Complex masonry or tile can run a full day.
Tie-In Details For Different Roof Types
Every roof needs a tweak. Here are field-proven approaches.
Asphalt Shingles (4:12 to 12:12)
- Standard step flashing works. Keep 2 inch laps.
- Head flashing upstand 10–12 inches is ideal on steeper pitches.
Low-Slope Shingle (2:12 to 4:12)
- Widen head flashing. Increase membrane coverage to 24 inches.
- Strongly consider a cricket, even on 24–28 inch chimneys.
Metal Roofs
- Use compatible metals to avoid galvanic corrosion.
- Use pre-formed sidewall and endwall trim with butyl tape. Still cut a 1 inch reglet for counterflashing.
Tile Or Slate
- Use pan-style flashing and bibs. Larger step pieces, often 10x10 inches.
- Maintain 2–3 inch headlaps to match tile/slate water paths.
Masonry Conditions
- Soft brick or crumbly mortar? Repoint first. Counterflashing needs solid joints.
- Stone chimneys often require shaped counterflashing and deeper 1–1 1/4 inch reglets in stable joints.
Quality Control, Testing, And Documentation
Professional Chimney Flashing and Roof Integration ends with proof.
Water Test
- Let sealants set per label if needed (often 30–60 minutes skin time).
- Hose test 10–15 minutes. Start low at the front apron. Move to sides, then the head.
- Watch attic or interior when possible. No drips, no damp marks.
QC Checklist
- 2 inch laps at all step seams.
- 3/4–1 inch reglet depth, continuous bead.
- End dams turned 1 inch at head flashing.
- Ice-and-water shield extends 18–24 inches beyond the chimney.
- No exposed face nails in flashing.
Documentation
- Take 6–10 photos: before, membrane, step weave, head/cricket, reglet, final.
- Note materials (metal type, gauge/oz), lap sizes, and test time. This protects your warranty.
If you're also looking to streamline professional proposals, our guide covers writing clear scopes, measurements, and photos so clients understand value. This pairs well with understanding change orders when hidden rot shows up. For invoicing, check out invoice templates that keep payment terms simple.
Pricing, Scoping, And Client Communication
Scope drives profit. Be specific.
Include In Your Scope
- Metal type and thickness (26-gauge steel or 16 oz copper).
- Cricket build if chimney is 30 inches or wider.
- Reglet-cut counterflashing, not surface caulk.
- Membrane coverage (18–24 inches beyond chimney).
- Water test for 10–15 minutes and photo report.
Tip: Capture on-site notes with photos and measurements while you stand at the chimney. Tools like Donizo let you speak the scope, attach photos, send a branded proposal, and get an e-signature fast. Clear scopes reduce back-and-forth and help you book jobs sooner.
Conclusion
Chimneys leak where metal, masonry, and shingles meet. Professional Chimney Flashing and Roof Integration solves this with correct laps, real counterflashing, and a tested tie-in. Next steps: 1) Use the specs above on your next job, 2) Build a photo checklist, 3) Water-test every time. For faster scoping and clean client buy-in, platforms such as Donizo help you capture details, send proposals, and get e-signatures. Do the work once, do it right, and cut call-backs for good.