Intro
On most jobs, marking tile holes around pipes eats time and breaks tiles. An Innovative Tool For Marking Tile Cutouts Around Drain Pipes solves that. It transfers the exact pipe center to your tile in seconds. In this guide, you’ll see what the tool is, how it works, and the steps to get clean, accurate cutouts with less waste.
It’s a small jig that clamps to the pipe, sets your grout offset, and marks a perfect center. You’ll drill once and fit right the first time. Fewer re-cuts. Cleaner finishes. Happier clients.
Quick Answer
Use an Innovative Tool For Marking Tile Cutouts Around Drain Pipes—a clamp-on transfer jig with an offset dial and a spring center punch. Clamp it on the pipe, set your grout gap (like 1/8 inch), place the tile in position, and tap a mark. Drill the hole, test fit, and set.
Table of Contents
Key Takeaways
- The jig marks center in under 30 seconds per tile.
- Set a 1/8 inch (3 mm) gap around pipes to prevent cracking.
- Start diamond hole saws at 45°, then square up after 3–5 seconds.
- Typical hole sizes: 1-3/8 inch, 1-1/2 inch, 2 inches.
- This method commonly saves 10–15 minutes on each marked tile.
Guessing the pipe center costs time and tiles. You score, you drill, you chip a corner. Start over. The waste adds up.
This simple jig gives you a repeatable process. It marks the exact spot, including your grout and movement gaps. You work faster with fewer risks.
If you’re also looking to streamline professional proposals, our guide covers best ways to price site conditions and include tile cutout allowances.
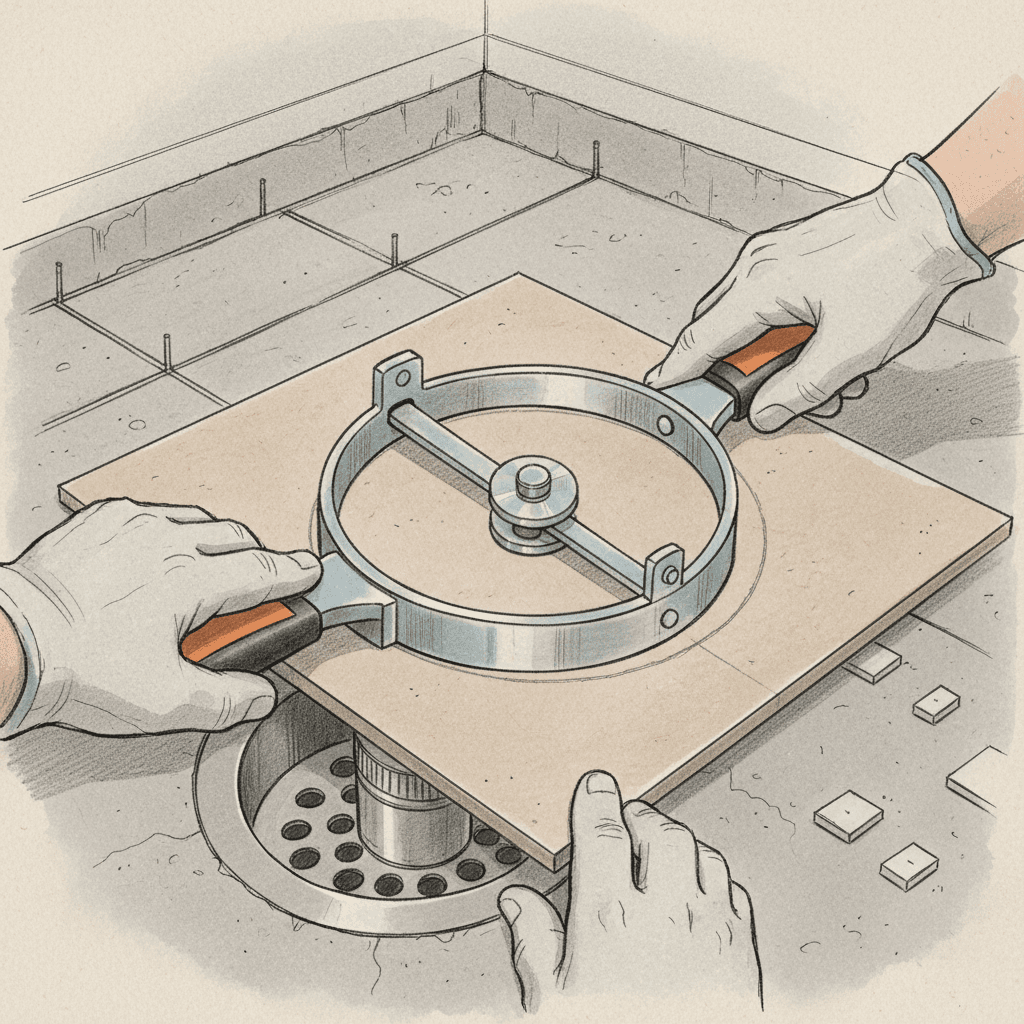
This Innovative Tool For Marking Tile Cutouts Around Drain Pipes is a small transfer jig that:
- Clamps to the pipe with a split collar (fits about 1–2-1/2 inch OD).
- Has an adjustable offset dial for grout joints (like 1/8 or 3/16 inch).
- Includes a spring-loaded center punch or graphite point.
- Lets you mark tile accurately without measuring from walls twice.
How it works:
- You set the jig so the punch aligns with the finished-face center of the pipe.
- You place the tile where it will live (spacers in, layout set).
- You press and mark the back of the tile right on center.
Result: Your drilling starts exactly where it should. No guesswork. No shifting the tile and hoping.
Follow these numbered steps for a clean, repeatable process.
-
Dry-Lay and Shim
- Dry-lay tiles with your normal spacers (often 1/8 inch or 3 mm).
- Check the joint to adjacent surfaces. Leave a 3/16 inch movement joint at tubs or corners if needed.
-
Set the Jig on the Pipe
- Clamp the jig on the pipe snug, not crushing it.
- Use a short level or straightedge to align the jig to the tile plane.
-
Dial the Offset
- Set the dial to add your grout gap and any extra slip (commonly 1/8 inch total).
- This prevents the tile from binding on the pipe after setting.
-
Place the Tile in Final Position
- Hold the tile where it will be set—against spacers and layout lines.
- Keep the tile stable. Support the back with one hand.
-
Transfer the Mark
- Bring the jig’s punch to the tile back. Tap once.
- You’ll get a crisp center mark, usually 1–2 mm in diameter.
-
Select the Right Bit
- Choose a diamond hole saw. Start 1/8–1/4 inch larger than pipe OD.
- Common sizes: 1-3/8 inch (35 mm), 1-1/2 inch (38 mm), 2 inches (51 mm).
-
Drill the Hole
- Speed: about 400–600 RPM for wet drilling.
- Start at 45° for 3–5 seconds to score a track. Then go upright.
- Keep the bit cool. Add water every 5–10 seconds if drilling dry.
- Seal the gap if exposed. Often a cover plate hides it.
- Wipe and check alignment from 3–4 feet back.
Bit Sizes, Offsets, and Tolerances
- Pipe OD varies. Measure with calipers or a tape. Don’t trust nominal size.
- Add at least 1/8 inch (3 mm) clearance around the pipe. Porcelain moves with heat and load.
- Tile thickness matters. Thin wall (6–8 mm) drills fast. Thick pavers (20 mm) need steady cooling.
- Keep your mark tolerance within ±1/16 inch (1.5 mm). The jig helps you hit this every time.
- For escutcheons, a 2 inch (51 mm) hole often hides small layout sins. Don’t overdo it.
Common Mistakes and How to Avoid Them
- Forgetting the grout gap: If you drill tight to the pipe, tiles crack later. Always dial 1/8 inch.
- Measuring from corners twice: Walls are rarely square. Transfer the mark from the pipe, not the wall.
- Dry-drilling too fast: You’ll glaze the bit in 10–15 seconds. Slow down. Add water.
- Starting the hole flat: The bit will skate. Start at 45°, then stand it up.
- Pressing the tile into the jig: Let the punch mark the tile. Don’t shove. Support the tile back.
Field Tips, Materials, and Real-World Scenarios
- Ceramic vs. porcelain: Porcelain is harder. Plan extra 1–2 minutes per hole.
- Glass tile: Use a specialized glass bit to start a pilot. Then switch to diamond and low RPM.
- Large-format tile (24×24 inches): Mark while the tile is on a stable foam pad. Less flex, fewer cracks.
- Wall vanity drain at 31–33 inches AFF: The jig shines here. Mark once. Drill 1-1/2 or 2 inches. Done.
- Shower riser plus drain: Mark the riser first, set, then the lower drain. Work top to bottom to protect layout lines.
If you’re pricing time on precision tile work, this pairs well with understanding job allowances and change orders. For contractors dealing with extras, we recommend clear language in your scope and using simple invoice templates that explain added penetrations.
Planning, Documentation, and Client Notes
Document pipe locations early. Take a photo with a tape across the pipe centerline. Add a voice note: “Lav drain center at 18-1/2 inches from right corner; tile joint 1/8 inch.” Tools like Donizo make this easy with voice, text, and photo inputs in one place.
When you write proposals, include a line like: “Includes precise tile cutouts around drain pipes with 1/8 inch expansion gap and covered escutcheons.” Platforms such as Donizo help you send branded PDFs and collect e-signatures so everyone agrees on details before you drill.
FAQ
What size hole should I drill for a 1-1/2 inch drain pipe?
Measure the actual outside diameter first. Many 1-1/2 inch pipes measure closer to 1.9 inches OD. A 2 inch (51 mm) diamond hole saw usually works, leaving about a 1/16–1/8 inch gap once centered.
Yes. It works on any round pipe penetration. For flat floor drains with square bodies, make a cardboard template for the square, and use the jig for the centered outlet if needed.
Do I still need spacers when marking?
Yes. Always dry-lay with your actual spacers. The jig’s offset assumes your final joint size. If you skip spacers, your hole will shift.
What if the pipe is slightly out of plumb?
Align the jig to the finished tile plane using a short level. Mark with the tile in its real position. Test fit, and keep a 1/8 inch clearance to allow for slight misalignment.
Can I drill dry without water?
You can, but go slow and pulse the cut. Cool the bit every 5–10 seconds. Wet drilling at 400–600 RPM is safer and extends bit life.
Conclusion
The Innovative Tool For Marking Tile Cutouts Around Drain Pipes gives you fast, repeatable accuracy. It cuts rework, protects tiles, and improves finish quality. To put this into action today:
- Add the jig to your kit and label common offsets (1/8, 3/16 inch).
- Standardize the 10-step process with your crew.
- Pre-document pipe locations with photos and notes on every job.
When you’re scoping tile penetrations, capture details with solutions like Donizo so proposals match site conditions. By dialing in this simple method, you’ll save time, reduce waste, and hand over cleaner work every time.